Could we change our attitude, we should not only see life differently, but life itself would come to be different. ~ Katherine Mansfield

Tuesday, May 22, 2012

Afternoon cookie break?

I make a mean cookie. I know, I know. We've been down this road before. But today, I share with you my best recipe. This is the one that friends curse me for as they are eating their second...third...fifth...enormous chocolatey treat. I, on the other hand, easily justify this as a breakfast food because it has oatmeal. It all depends on how you look at things. I prefer to view the world through sugar-coated glasses.

Usually I have to adapt baking recipes for high altitude (curse you, Denver) but this chocolate chip cookie is courtesy of 5280 Magazine and Denver's own Fuel Cafe. I've swiped this directly from the 5280 article, so hopefully they'll forgive me. Subscribe to 5280, eat at Fuel Cafe! (See? Free advertising!)

I've also decided to use this as an opportunity to try out my new Miu silicone baking liner and Wear-Ever half sheet pan. I usually rely on my Pampered Chef Stoneware Large Bar Pan for cookies, so we'll see which one produces the best results. Or if there is any difference at all...

FUEL CAFE'S CHOCOLATE-CHIP OATMEAL PECAN COOKIES


Ingredients:
½ pound unsalted butter, softened but not melted
1 cup brown sugar
¾ cup sugar
1 teaspoon salt
1 teaspoon baking soda
2 eggs
1 teaspoon vanilla
2 cups flour
2 cups old-fashioned oats (not instant)
2 cups mini chocolate chips
2 cups pecans, chopped and untoasted

Preheat oven to 375°. In a stand mixer, with paddle attachment, cream together butter, brown sugar, and regular sugar for about 5 minutes. Add salt and baking soda. On low speed, add one egg at a time until incorporated. Do not over-mix. Add vanilla. Mix in flour at low speed until incorporated. Do not over-mix. Add oats, chocolate chips, and chopped pecans, only until combined. 


NOTE: Part of the reason these cookies work at this altitude, and taste so so delicious, is the high "chunky bits : dough" ratio. Don't mess with this, or your cookies will pancake out. If you decide to leave out the pecans for some crazy reason, replace them with an additional cup of oats. The adorable beater-licking toddler is optional, but I can't recommend him enough. 


Scoop dough by ¼ cups onto parchment-lined baking sheet and bake for approximately 11 to 12 minutes until golden brown.  

Miu baking liner with Wear-Ever sheet pan

Pampered Chef Stoneware

Cool briefly on baking sheet before transferring to wire cooling rack.

Makes 20+ large cookies.

And for my results?

Stoneware vs. Miu/Wear-Ever


Both sets of cookies were chewy and addictive, but the cookies on the Stoneware pan kept their shape and density while the Miu cookies fanned out. I'm sure I'll use the silicone liner and half sheet for other things, but I'll keep making cookies on my secret weapon, the Pampered Chef Stoneware. (I use their pizza stone as my second pan for large batches.) 

Bake on.


Thursday, May 17, 2012

Restoring Cast Iron, or History Repeats Itself In My Kitchen

Reduce, reuse, recycle. I choose not to question whether my zeal for second-hand goods is a result of wanting to cut down on consumer waste or a direct result of what my Grandma called her "cheap Scotch blood." (Scotch as in Scottish - she'd haunt me if she thought I portrayed her as a boozer.)

Either way, I love a good deal. The majority of the baby goods in my home - from bassinet to swing set, high chair to clothing - have both a previous and future owner. But this is not a blog about Craig's List baby goods. Consider this one giant segue leading you to my newest kitchen obsession.

Cast iron.

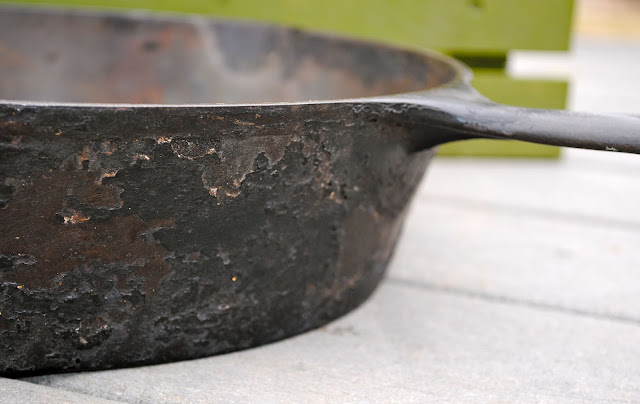
I have fallen in love with a #10 Wagner cast iron pan from the early 1900s that my mom found for $10 at a yard sale. (Huge benefit to me that the "granny" of ebay's Granny's Trinkets and Trash is my mom.)  It weighs more than a bowling ball and I have definitely built some arm muscle since I've started cooking with it. There is comfort in the heft though - the feel of a thing that is well made. I like to imagine the three generations of mothers before me using this same pan to feed their families. It has good mojo.

When I first got it though, there was work to be done. Most old cast iron requires some reviving. It was covered in rust and layers of cooked-on grease that the cast iron world technically refers to as "gunk."


Like all innovative DIY newbies, I went online for information on how to restore this beauty. I found that people are CRAZY when it comes to cast iron. I'd find a blog with what I thought to be good information only to be dissuaded by reader comments hundreds deep on why a particular process does or does not result in a perfectly seasoned non-stick pan. For cast iron junkies, the "perfectly seasoned pan" is the elusive holy grail of cookware. So, I read a lot and then decided to wing it.

My salvaging supplies consisted of oven cleaner, protective gear for me and the patio, a few garbage bags, 2 wire brushes originally for stripping paint, vinegar, borax, and those blue soap SOS pads that you can probably find right now corroding in a corner of the cabinet beneath your kitchen sink.


My process consisted of spraying down the pan with oven cleaner, double-bagging it, and letting it sit in the sun for 48 hours before rinsing it off and going to town with the wire brushes in an effort to get the gunk off. It took 4 rounds of this, and a final bit of elbow grease courtesy of my husband, before I got the pan down to its raw iron core. It still looked rusty but it was smooth.


Then I gave it a final scrub with the SOS pad before I soaked it in a 50/50 white vinegar and water bath for about 12 hours. After that I thoroughly cleaned the pan with borax (borrowed from my laundry room - 12 Mule Borax is great for your whites) to neutralize the vinegar.

Time to wipe it off and then pop it into a 200 degree oven for 20 minutes to get it bone dry. Let the seasoning begin! I coated it with a thin layer of organic flax seed oil and put it in a 500 degree oven for an hour, then let it cool in the oven for 2 additional hours, before taking it out and repeating this process. Based on a blog I found, I did this a whopping SIX TIMES. I was about 2 weeks in to this pan at this point, but things were looking pretty good.


I still didn't have that deep dark black that I coveted though, and my first trial with cooking salmon was semi-disastrous. I wanted my friend Julie's pan from The Crankin' Kitchen - she makes amazing food with a jet black pan that was her Grandma's.

Back to the internet, and I stumbled upon the best piece of cast iron advice yet. In essence, a very down-to-earth man, whom I picture to have a slightly shaggy haircut and a handlebar mustache ala Sam Elliott, advised the cast iron world to calm down and take a breath. He told us all to clean our pans with soap (since we'd be re-seasoning), dry them with heat, wipe them down with a good layer of shortening or lard, and throw them into a 300 degree oven for 2-3 hours. Wipe them down once more and then start cooking. He said to break in the pans in with fatty meats (hello bacon friend) and deep fried dishes until they reached a glossy black finish over time. Yep, just like our grandmas did. I would have to slow down, curb my notions of instant gratification, and give my pan some time.

So, I have been frying bacon, chicken cutlets, and these delicious Asian fish cakes to my heart's content.


After dinner I wipe the pan down with a paper towel and leave a light coating of oil from that night's meal. And lo and behold! Little by little, meal by meal, my lovely history-filled pan is turning in to the skillet of my culinary dreams.


Monday, May 14, 2012

Right here, right now.

I am a horrible future-dweller. It causes me a lot of anxiety. I often find myself caught up in what could happen and my brain goes off in a terrible spiral of doom. This is especially true when I wake up in the middle of the night and my logic brain is still sleeping. I find myself at my most vulnerable at 2 am, when the likelihood of dropping one of my children into the Grand Canyon while on vacation, or being trapped in my car after driving into a river, or Gabe being attacked by a mountain lion while out on a suburban trail run are not only plausible but actually probable.

Welcome to Crazy Town, population of 1.

Crazy Town held a parade last week in anticipation of Gabe's latest checkup with his cardiologist. It has been eight months since his mitral valve repair, and every echocardiogram leading up to this one has resulted in bad news ranging from disappointing to devastating. Needless to say, I spent a grim Tuesday morning penning my husband's eulogy in my head, figuring out how to bravely raise two boys on my own, and working my body into a state of nauseous panic.


Fun fact - your body does not know the difference between imagined tragedy and actual tragedy. So, if you have a particularly vivid imagination, you can wreak havoc on your body by causing physical reactions to things that have never happened. The mayor of Crazy Town has mad skills in this arena.

And yet...

Despite all of my nutso mental preparations, the sky did not actually fall. I am happy to report that Gabe's fabulous, wonderful, strong-in-spite-of-it-all heart is pumping away like a champ. This week was a win. Turns out I made myself sick over nothing.

I'll cut me a little slack due to the gravity of this particular situation, but even if we had gotten bad news worrying would have accomplished nothing. It doesn't help, it doesn't stop the bad, and it in no way prepares us for dealing with actual life turbulence. It is an absolute waste. And the bitch of it all is that I can get equally caught up in something as trivial as a fake argument that will never happen based on a slight that was never actually received. I am quite adept at working myself into a frenzy over money troubles that have yet to manifest themselves. I have also been known to freak my freak, as my mom so wonderfully phrases it, about which kindergarten to send Jude to even though that actual decision is almost two years away.

I get so lost in what might/could/will happen that I ruin the here and now. It's a sickness. I need to fix this for myself, but I also feel compelled to address this behavior before I pass it on to my children.

Let's use now as an example.

It is 8:41 pm on a Sunday and I am stressing over the Q2 taxes that are due at the end of the month, the fact that I may or may not have a freelance gig after next week, and we need to call plumbers to bid on what I fear will be an expensive upgrade to our house's water main by order of Denver Water. All of these events will play themselves out within the next few weeks, but I have no idea what will actually happen. And seriously, what could I possibly do about them right now at 8:44 pm on a Sunday? Absolutely nothing.

The best trick in my bag, and the one I don't seem to utilize enough, is to root myself firmly in the present moment.

And right now, everything is okay.

Right now, at 8:46 on a Sunday, this is what I know:
Gabe is giving Jude a bath.
Aidan is practicing his new "ka-ka-ka" sounds in my lap.
Belle, our Boston Terrier, is snoring beneath a pile of blankets at the end of the couch.
Our lab Rocky is passed out at my feet.
My house is filled with the people I love most.
We are all healthy.
We are all safe.
I don't know what will happen in an hour, or a day, or next week, but it is now 8:48 on a Sunday and right now, right here, I am just fine.

***

It is 8:49 on an average Sunday. No one is home in Crazy Town. The sole occupant is currently vacationing in the present moment. Someday she hopes to move there.


Monday, May 7, 2012

Tools of the Trade

How have I just learned about America's Test Kitchen? I am in food nerd love. Not only can I watch their geek-not-quite-chic show on PBS, but for $30 a year I have access to a dozen years of knowledge online.

I can lose hours reading their product reviews, and since I am cooking so much right now I found the following directive on cookware sets to be incredibly useful:

Our ideal set would include a roomy 12-inch traditional skillet (or fry pan—we use the terms interchangeably) that’s big enough to fit four chicken breasts; a 10-inch nonstick skillet for cooking delicate omelets and fish; a 12-inch cast-iron skillet for frying and searing; a 4-quart covered saucepan for vegetables and other side dishes; a 2-quart covered saucepan for heating soup or cooking oatmeal; a 6- or 7-quart enameled cast-iron Dutch oven for braising, deep-frying, and even baking bread; and a large stockpot that can do double-duty for pasta, lobster, or corn on the cob.

This "ideal set" doesn't exist, but I am using this list as a guide to build my own collection one piece at a time. Having the right tools makes any task more enjoyable, especially if it's a task that you love. I'm also a big proponent of buying a quality item and taking care of it rather than buying something cheap and having to replace it every few years.

Quality pieces already in my collection include 10- and 12-inch nonstick skillets (Calphalon for Mother's Day last year - thank you, Jude), a #12 Wagner 10-inch cast-iron skillet with 3-inch sides (100 years old - I'll post soon about restoring this yard sale beauty), a 6-Qt enameled dutch oven (Lodge is a totally functional $55 alternative to the $300 Le Creuset that I covet...), and a 6-inch Le Creuset enameled skillet (not on the list, but incredibly useful for reductions and reheating single servings).

My newest love? A 12-inch traditional skillet by All Clad.


Glorious. Even the packaging was wonderful. I was looking at cheaper stainless steel sets and singles, but ATK gave this their highest rating and I now trust those public access food scientists with all my culinary needs.

As with all things, you get what you pay for. But I do love a deal so I waited to buy this $155 treasure until Macy's had their Friends and Family special. 20% off plus an old $15 store credit and she was all mine for $106 with free shipping. If I were Julie Andrews, and part of me has always wished that I were, I'd be singing to you about three of my favorite things right now - food, quality American-made products, and a sweet sweet bargain.

We christened the pan last night with sea scallops - easily fitting 8 in the pan without crowding them. I didn't take pictures, but here's the fool-proof recipe for melt-in-your-mouth scallops.

As for my lovely pan? Ah, she did just fine.

SIMPLE SCALLOPS
(serves 2)

Ingredients:
8 sea-scallops, cleaned and patted dry
2 Tbsp EVOO
salt and pepper
1/2 C dry white wine
3 Tbsp butter

Preheat your pan over high heat with 2 Tbsp EVOO and 1 Tbsp butter. Liberally salt and pepper your scallops. After butter foam starts to subside, add scallops to the pan and let them cook 2 minutes until they release easily and have a nice dark crust. Cook an additional 1-2 minutes on the second side and then remove to a warm plate where they will continue to cook slightly as they rest. (Do not overcook them - they get tough and gross. I didn't think I liked scallops for years because I had rubbery restaurant scallops the first time I ordered them.)

Deglaze the pan with half a cup of dry white wine - reducing by half while you scrape the nice crusty fond from the bottom of the pan to create a lovely sauce. (I used our go to chardonnay by Cupcake Vineyards. Half cup in the sauce, half bottle in my glass.) Remove sauce from heat and thicken with 2 Tbsp butter.

Spoon pan sauce over scallops. Cry because they are so so good.