Could we change our attitude, we should not only see life differently, but life itself would come to be different. ~ Katherine Mansfield

Tuesday, December 3, 2013

Dead Bees. Damn.

It happens. I know it happens. But the Cherokee Girls (white hive) are on their last legs, and I am deep in mourning for the loss of my industrious little bugs.

The hives. Cherokee on left, Great Grand on right. Giant shadow courtesy of the beekeepers and a late afternoon sun.
I haven't been in the hive for 2 months, but on last inspection they were killing it - brood, bees and honey galore. They have always had a fairly large dead bee yard in comparison with the Great Grand Girls (green hive). And I have noticed fewer bees at the entrance over the last month or so at the Cherokee hive.

Then on Sunday the hive just had a feeling of desolation. It was a warm day and the Great Grand Girls were out and about, and I could see them checking out the Cherokee hive. The GG Girls are more of a vibrant orange color, and the Cherokee Girls are a more subdued brown. I quickly popped the top of the Cherokee hive and there was no sign of life. A quick look into the top of the GG hive and and bees were spilling out of the inner cover. Something was wrong.

Yesterday was what appeared to be the last warm day of this oddly warm fall, so it was time to dig deeper. Kris, brother and bee apprentice extraordinaire, came over and we started our investigation. I still don't know what happened, so I'll lay out the clues to you as we found them and see if anyone in the ether has a better idea of what happened to my lovely bees.

First, a panorama of my bee setup. The hive openings face SE, with a wind block directly behind them. They are surrounded by pines and scrub oak, so they are protected, and receive adequate sun in the mornings. They are shaded in the later part of the afternoon.


And here are the dead bees in front of the hives. First, Cherokee. The bees look as if they have baked in the desert, and this has always been the case. But now, there aren't any bees that look "fresh dead," if you will.


The dead bees at the GG hive are almost alive in contrast. (Poor drones - it's a rough time of year for those fellas.)

When the Cherokee hive was opened, there were no bees in the top deep but it was totally full of honey. When we removed the upper deep, the lower deep looked deserted.


We found tons of honey but didn't hit signs of potential brood, or see the remaining handful of bees, until we arrived at the fifth frame in the center. The bees who are still alive were clustered at the bottom of the frames in the lower left hand corner of this picture. They were lethargic, listless and could have all fit into a large coffee mug.

This was the scene when we popped the top on the GG hive. Very different.


We started digging into the lower Cherokee deep for clues. As a novice beekeeper, I couldn't quite tell what was uncapped honey and what was possibly dead brood. There were random dead baby bees who seemed to be mummified right before they emerged. We did not spot a queen, or recent signs of a queen, on any of the frames.
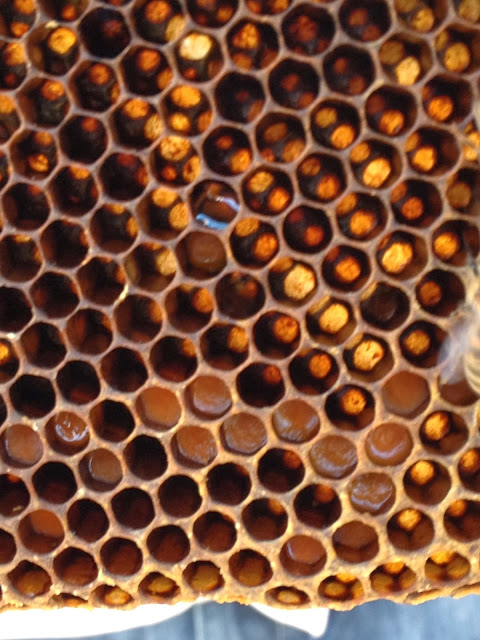
Gummy brood here on the bottom? There was capped honey at the top of the frame. This frame does not have cell starter, so this is all bee-made honeycomb.


It's hard to see, but there are 4 mummified bees in the chewed out looking holes in the bottom right of the picture. The spotty pattern of the filled cells doesn't look healthy or normal to me. 
I did poke into one of the ambiguously glossy cells and it was a white goo. Not "ropey" as some of the worse foul brood diseases talk of, just mush. You can see it in the destroyed upper left portion of comb. I also popped out one of the mummified bees, which is on the end of the stick. There was no distinctive smell of yeast or rot to the hive or the frames.


And that's where we stand. What happened to my bees? Maybe chilled brood? There are definitely not enough bees to cover a substantial amount of brood. Did the queen die somehow and now we're just watching the remaining bees die of old age? Do the mummified bee remains hint at chalk brood? I just hope it's not something contagious since I added the Cherokee Girls' upper deep of honey to the GG Girls in order to help them through the winter. Whatever the cause of the Cherokee Girls' collapse, the freezing weather this week is sure to finish them off.

Bees. All of the prep. The books. The classes. The care in selecting hive locations and placement. And still I can't control the loss of a colony. It makes me sad. I hope to do better next year.

Wednesday, October 9, 2013

Fall Pumpkin Chocolate Chip Cookies

I love fall. A Colorado fall is only 5 minutes long, but they are 5 glorious minutes. As a cool weather girl, I eagerly anticipate 50 degree temperatures and warm fires as I sweat my way through a too hot summer.

Fall clothes are better. There is less of a need to "go go go" and more reasons to curl up with the kids or a book. And the food. I am happy to be cooking comfortably again instead of avoiding my stove as the evil heat monster that will kick the air conditioner into overdrive.

To welcome fall, and the requisite return to all things pumpkin and spiced and delicious, Jude, Aidan and I made the pumpkin cookies I grew up eating. (Well, Jude helped and Aidan ate chocolate chips.) These cookies are like the best part of the muffin...and can quickly lead to an addiction that will result in the less desirable form of muffin tops.

Music pairing: Band of Horses "Cease to Begin"
Drink pairing: Ice cold milk


Pumpkin Chocolate Chip Cookies

Ingredients
(no high altitude adjustment required) 

1/2 C butter
1 C sugar
1 C pumpkin puree
1 egg

2 C flour
1/4 tsp baking soda
1 tsp baking powder
1/2 tsp cloves
1/2 tsp cinnamon
1/2 tsp nutmeg
1/2 tsp salt
1/2 C chocolate chips

Cream butter and sugar. Add egg and pumpkin and mix well. Sift together dry ingredients and gradually incorporate into pumpkin mixture. Drop by rounded teaspoonfuls onto greased cookie sheet and bake at 350 degrees for 15 minutes. Do not cut cooking time. Yield: 24+ cookies. 

(Note: Cookies are better on day 2 and 3. I don't know about day 4...they've never lasted that long.)


Tuesday, September 24, 2013

Prepping the home for winter

I write a guest blog, Hey Neighbor, for Dwell Denver Real Estate once a month. This is September's post.

*****

Hey Neighbor,

It’s that time! The nights are cooler, the leaves are edged in yellow, and we’re a few short weeks from what always proves to be a snowy Halloween in Colorado. So how best to prep your home for the months ahead? Follow the checklist below and you are well on your way to a stress-free winter. 

  1. Check gutters and downspouts for debris. Buy extenders that divert downspout water 3-4 feet from your home. I love these downspout extensions from Home Depot and have used them on 2 homes to great success. 
  2. Scan your roof for missing shingles or damage from summer storms. Make sure all flashing is secure.
  3. Clean your fireplace and chimney, making sure the flue is open and free of debris.
  4. Clean your outdoor furniture and cover or store for winter.
  5. Blow out your sprinklers and outdoor faucets before turning them off for the season. (We call a professional for this, but you can always try your hand at it via a Youtube tutorial.)
  6. Remove the bag from the lawn mower and mulch your leaves to allow them to protect and feed your grass through the winter. This is also the time to mow down seasonal grasses and wild flowers to allow them to reseed next spring.
  7. Add soil amendments (bone meal, manure, compost) to your garden soil and cover with leaves until spring. Alternately you could plant a winter cover crop like rye. Check out Plant Talk Colorado or Organic Gardening for more info.
  8. Drain the gas from mowers and power tools before you stash them away for the winter.
  9. Make sure snow blowers, shovels, salt and ice melt are stocked and in working order before the first storm hits.
  10. Fix drafty windows and doors. You can address the issue yourself, or pop over to Ogsplosh on Etsy and order a few cute draft snakes for the home. Sometimes the easiest fixes are the best!
  11. Reverse ceiling fans (there should be a switch on the base) and use on the lowest setting to blow hot air back down into your living space.
  12. Install a programmable thermostat if you haven’t yet. Check out this Lowe’s tutorial – super easy. 
  13. Replace the filter in your furnace.
  14. Test the batteries in smoke and carbon monoxide detectors as well as flashlights.
  15. Stock a few essentials for snow days so that you aren’t one of the masses hitting the local grocery during a blizzard. Easy go-to dinners to keep at the back of the pantry include macaroni and cheese (yep, we have little kids!), canned chili, canned soups, crackers, and that all-time classic, the frozen pizza. Better yet, make double batches of soups, sauces and casseroles going into fall and freeze them!
  16. Put your feet up with a spiced apple cider and a good book – you’ve earned it! Bring on the snow.

Tuesday, September 17, 2013

Testing bees for a mighty mite load

I have reached a new level of weird in my life in that I check my bugs for bugs.

A few weeks ago, my Saturday morning was devoted to learning how to check a bee colony for mite load. It's considered a given that a colony will have varroa mites - disgusting little things that suck their host's blood and can overtake a small or weak colony - and a certain level of mites is considered manageable.

Let's take a moment for a group shudder. I despise parasites like mites and ticks. When our dogs had fleas thanks to a bad boarding experience a few years back I went psycho on my house and disinfected, Boraxed and bleached for weeks. If I ever had bed bugs, I would just have to move and buy all new things. So how is it that this girl now inspects tiny bees for wee little mites? Life. Crazy.

Back to bees.

Don (bee mentor extraordinaire) started our day with a lesson on mite control. He is against the use of miticides, yet another reason we get along so well, as it leads your hives down the terrible pesticide cycle of working...not working as well...needing more poison...working again...well, not so much anymore...etc. The mites that survive the poison are the ones who show a resistance, and these ones are left to breed. Don wants to turn this cycle on itself and instead of breeding stronger mites, skip the poison and breed stronger bees. Darwin say wha???

Rather than using miticides, Don allows for a "survival of the fittest" situation within the bees. If a whole colony is lost to mite load, then it wasn't strong and he starts over. But, if a colony is able to survive with mites, and overcome mites, and shows a resistance to mites and an ability to thrive in their presence, then these bees are able to continue to live and flourish and reproduce. (In my own hives, the Great Grand Girls have a queen who was bred specifically to produce workers with an ability to detect and destroy larval mites in the hive - here's hoping! Colorado residents interested in such a queen should look into Highland Honey Bees.) Don also naturally disrupts the mites' breeding cycles by doing splits, but that is a lesson for another day.

If you aren't planning on using a miticide, then testing for mite load is more a practice in knowing what's happening in your hives and reaping the benefits of that age old axiom of knowledge being power. And, it's kind of grossly fun. We used the Powdered Sugar Test. If more than 10 mites are detected, a serious infestation is present.

First, gather all of your equipment. We used an old light colored dish tub, a makeshift plastic bee funnel (the black plastic thing in the picture), powdered sugar, a 1/2 C measuring cup, a TB measuring spoon, and a Mason jar with a wire mesh lid. And the smoker of course. These are post-Solstice agro bees and we are not crazy people...just odd bee people.


Then we went in to the hives to find a brood frame with a solid amount of bees, but NOT THE QUEEN! It is fairly important that the queen not be a part of this test. A few bees will be lost, and you don't want it to be that one. There are thousands of others to put to the task, so taking the time to ensure the queen isn't on your brood frame of choice is well worth it.


The next steps came really quickly, so line up your supplies and if you can, use a buddy. The bees get super pissed.

Shake the brood frame over the funnel (any long v-shaped piece of plastic or whatnot will suffice) so that a bunch of angry bees fall off. Quickly pour the funnel of bees into the wash tub. Gently scoop a 1/2 cup of bees, pour them into the Mason jar, and put on the lid.


Dump the remaining bees that are left in the washtub away from where you are working so that they find their way back to the hive without deciding to take a detour up your pant leg. Next, add a TB of powdered sugar to the top of your mason jar and gently force it through the screen and in with the bees.


Now, turn the jar on its side and gently roll the bees for the next two minutes. This part is interesting since the sugar makes the bees body temperatures rise (which in turn makes the mites fall off, which is why this works) and it looks like the jar is smoking. Watch the video below and sample a mini lesson from Don as well.


Next, shake the jar over the dish tub. It should fill with powdered sugar and dislodged mites. If this proves slow or annoying, you can do what we did and just pour the bees into the tub.


Time to look for the bloodsucking little assholes who are trying to eat your bees alive. It helps to have a magnifying glass on hand to separate the mites from random little specs of dust. In this pic, there is one mite right in the middle, and another on the bottom left.


Don was lucky this day. Of the 3 hives we checked, the highest mite count was 3. His girls seem to be doing quite well without the use of poisons, thankyouverymuch. So make whatever choice you will, but know that good results are possible with minimum interference.

Wondering what we did with the sugary bees after the test? Dumped them back on the top of the hive so that their sisters could lick them clean. Not a bad way to end this day at the fair.

As for me, I did not test my own hives since they are in their inaugural year and I am fairly paranoid about not disturbing my bees if I don't have to. I will do a mite check before and after my 2014 summer splits though, so I'll get my own numbers then. I am more than a little curious to see if my stronger nuc colony (Cherokee Girls) has more or less mites than the package bees with the replacement queen (Great Grand Girls). Assuming they all make it through the winter. Come on girls!!


Tuesday, August 27, 2013

Homemade Chalk Paint Renovation

I write a guest blog, Hey Neighbor, for Dwell Denver Real Estate once a month. This was August's post.

*****


Hey Neighbor,

My newest DIY infatuation is with Annie Sloan Chalk Paint. It's easy to use, the colors are beautiful, and a complete furniture transformation takes place in a day or two. The only drawback is the price - the supplies last a long time, but the cost of entry isn't cheap! Enter my sister-in-law Li. She's so frugal she'd make a penniless monk look like he lives his life with frivolous abandon. 

Li and my brother recently moved from a 700 sq foot New York apartment to a 3000+ sq ft, 4 bed / 4 bath home just south of Denver. Movin' on up! The trouble of course lies in the fact that they do not have enough furniture to fill their new suburban palace. It's a familiar story, but fortunately for us, we get to learn from a thrifty lady, her auction find, and a Pinterest recipe for success.

Li bought a $10 end table at auction to go with her new couches and super fab $100 estate sale rug. The table had good bones, but an ugly finish. It also did nothing for their decor.


With her sleuthing skills, Li then did a Pinterest search for chalk paint and found the following recipe on LiveLoveDIY's blog:

Homemade Chalk Paint: 2 cups paint, 5 TB Plaster of Paris, 2 TB water.

The bonus of the self-made paint is that you can pick any color you want - Li went with Benjamin Moore in a punchy Japanese Kimono color - and all of the supplies cost her less than $50. (Full disclosure, on my first trip to an Annie Sloan dealer I left the store with $230 worth of similar merchandise in my bag.)

We spent a Saturday together transforming the little end table that could.

First, a quick sanding to take off any peeling varnish. Then, Li made her chalk paint. 

Two tips: 1) mix the water and plaster of paris first to make a slurry before adding to the Benjamin Moore paint and 2) if it's too thick, add a little water until it's the consistency of normal paint.


Three painstaking coats were added to the table. If Li had been going for a distressed look she could have gotten away with two, but the goal here was a modern pop of color.

After letting the table dry between coats, and then overnight after layer #3, Li applied Minwax Paste Finishing Wax with cheesecloth and buffed the table to a shine.

Voila!


As the recipient of half a bag of Plaster of Paris, I can't wait to try this new painting technique in my dining room on a sideboard begging for a facelift. I'll let you know how it goes! And Li and I would love any tips you have on furniture restoration. We are officially addicted. Thanks, neighbor.

Wednesday, August 21, 2013

Perfect Pasta Salad

In theory I've always loved pasta salad. A quick meal in the summer. An easy side dish for get-togethers. Something I can make the night before and dinner is already taken care of the next day. In actuality, most pasta salads I've tried have been pretty to look at and nothing for the palate to write home about.

So, I made up my own. You may think it looks just like everybody else's, but the key is in the type of ingredients. And a homemade dressing. I encourage you to make it once, as is, before you stray. Also, I am not responsible for a lesser choice in tortellini, meats or cheeses.


Perfect Pasta Salad
serves 4

1 12 oz bag dried Barilla Cheese and Spinach Tortellini 
4 oz Tillamook Monterey Jack cheese, cubed
4 oz Olli Norcino Salame, cubed (FYI - in Denver you can get this at Marczyk's)
3/4 C fresh or frozen organic peas

1/2 C Quick and Easy Vinaigrette, heavy on the red wine vinegar

Boil pasta according to package directions. Add peas in the final 30 seconds if fresh, 60 seconds if frozen. Pour contents into colander and rinse with cold water. Allow to drain while you prep the vinaigrette.

Mix all four dry ingredients gently in a large bowl. Mix in vinaigrette, salt and pepper to taste. Cover and refrigerate for at least one hour, preferably overnight. If it's a little dry when you serve it, add a few dashes of red wine vinegar. The acid balances the meat and cheese.

When accompanied by crusty bread and sliced fruit, I can easily feed my family of 4 with lunch leftovers for my husband and I. We drank an excellent three-buck-chuck Shiraz with dinner and found that it paired quite nicely. Enjoy!

Tuesday, August 20, 2013

Quick and Easy Vinaigrette

Salad dressing from the grocery store, even the semi-sacred natural grocery stores, are overly sweet concoctions that lack body and overflow with additives. This simple vinaigrette can be made fresh in 60 seconds and is easily adapted to suit your family's tastes. I can't attest to how it stores, since I make it when I need it.

Basic Vinaigrette (yields 1/2 cup)

Mix the following ingredients in a bowl:

2 TB red wine vinegar
1/2 TB dijon mustard
2 tsp honey
1/4 tsp salt

Whisk in 1/4 C Extra virgin Olive oil. Adjust seasonings to taste. Serve immediately.

Variations:
Add 2 cloves minced fresh garlic or 1 small minced shallot.

Add fresh herbs - rosemary or thyme mix well in this.

Add 1/4 C finely diced tomatoes.

When I am making pasta salad, I add more vinegar or fresh lemon juice so that the bite in the dressing doesn't get lost in the pasta.

Mix and match any of the ideas above - or experiment with your own - and leave the bottled junk at the grocery store for the rubes.


Tuesday, August 6, 2013

Deer Repellent

My tomatoes have turned me against Bambi.

I am relegated to a container garden this year as we are overrun with deer and rabbits in our neck of the woods. (Seriously, where have all the predators gone?) Normally I love the wildlife, and am enamored by Aidan running to the sliding doors every morning and calling out "Deer? Rabbits? Are you?"


Until a month ago, I was also in love with the container garden. Virtually no weeding. Pretty colored pots. Giant lovely tomato and pepper seedlings courtesy of my favorite plant-pushers, Seed Savers. I was set up to have the most successful, trauma-free garden of the last four years. Two of my plants were taller than my toddler! I should have taken a picture because, as we learned from our old pal Pony Boy, nothing gold can stay.

Enter the deer.

Sad little garden.


They took me down to the stalk. Then the plants recovered over the course of a week! And then the bastards took me down to the stalk again. Only the prickly-stemmed squash escaped unscathed.

Deerpocalypse 2013!!!


Like a discarded popsicle stick...


The sight of two speckled day-old twin fawns frolicking in the trees outside my window almost made me offer up my plants directly...and then I remembered how delicious summer tomatoes are fresh off the vine, hot from the sun, and I toughened up. I taught Aidan to say "No deer! Bad deer!" and we returned to the garden.

Photo bombed!

I wish we could blame the dead yard on the deer too, buddy.


I sprayed the plants with liquid capsaicin from the local feed store. So far so good. Apparently Bambi is not into food that registers on the Scoville scale. We're 3 weeks out from the last deer blight and the plants are making a strong comeback.


Heritage plants unite!


I'm hoping for one solid round of fruit before the frost, and then I'll chalk this up to a lesson learned for next year. If the capsaicin doesn't hack it in 2014, I have a girlfriend who can get me a bag of deer-deterring hair from her salon (it's Aveda, so it's designer!) and there is an African lion rescue 30 miles down the road that gives away free lion poop to spread as a natural form of deer-be-gone. Ah, country life.


Monday, August 5, 2013

Simple Skillet Recipes - Zucchini and Eggs

I can thank my Italian grandma for my great hair, pleasing peasant build, and this recipe that takes advantage of baby zucchini and (eventually) my own eggs. Farm to table in 8 minutes or less.


Zucchini and Eggs
(serves 1)


Ingredients

2-3 baby zucchini (less than 6 inches)
1/2 TB butter
2 eggs, slightly beaten
salt and pepper to taste
fresh salsa (or pesto...or a nice slice of stilton...maybe a fruit compote...)

Melt the butter in a skillet over medium heat and add the zucchini, sliced thin. Sauté until softened. Add eggs, salt and pepper, and let set. (I scramble them - easier!). Remove from heat, top with salsa and enjoy!

(This pairs well with an NPR Tiny Desk Concert and San Pellegrino Aranciata over ice.)

Thursday, July 18, 2013

Let's put the social back in social media

I write a guest blog, Hey Neighbor, for Dwell Denver Real Estate once a month. This is July's post.

*****

Hey Neighbor,

So I like Facebook as much as the next person. And it's fun to check in on my "friends." But what I really seem to be missing out on right now is checking in with my FRIENDS. The real people. The ones who live across town that I still only see at a yearly barbecue and the occasional big event, like weddings and reunions. The ones I used to grab coffee with daily when we worked in the same office. The pals who can just share a look with you in a crowded room and you know exactly what they are talking about.

In the spirit of being truly social - with eye contact, and body language, and the sharing of food and drink - I am challenging myself (and you) to use Facebook to create a real life happening instead of relying on a virtual "like" or "share" to feel connected. I'll even offer up party ideas. Now all we have to do is create an event and invite our "friends" to become our real life FRIENDS once again. Super easy, no collecting of emails or addresses, just a few clicks of the mouse. 

(No shame if you don't know how to create a Facebook event. Follow the guide here.)

10 Ideas for Facebook Events with Friends
(How you doin'?)
  1. screen_shot_2013-07-18_at_8.12.54_am_400_01
    Alumni Happy Hour. Organize a Happy Hour with friends you know from a particular time or place. It's a great way to see a bunch of buddies in one swoop and everyone has something in common. (Jonesy'sVita, and Billy's Inn all have worthy happy hour specials.)
  2. Playdate. This is a no-brainer, and a great way to introduce friends who have kids. Dave and Buster's is a fun, easy option for dads hanging out with older kids on a too-hot summer day, while the Denver Zoo is always a hit with moms and kids of all ages. (FYI - the snack bar by the bears serves alcohol...!)
  3. Pinterest Party. Admit it, Facebook and Pinterest are the two biggest Internet time sucks of your day. Why not combine them and have a night with the ladies? Guests would bring a drink or dish they found on Pinterest (like this! or this! orthese!) and the host would pick a Pinterest DIY project and provide the supplies. 
  4. Denver Dive Bar Crawl. How about a once-a-month get together with friends that rotates between Denver's best neighborhood locals? With friends spread out across the city, you could take turns picking the date and place. Just make sure you assign the next host before parting ways! I'll even get you started: Berkeley has relied on Patrick Carroll's since before the neighborhood was trendy, Virginia Village / South Cherry Creek boasts a laid back brew-pub with The Bull and Bush, and Lodo is graced with the very un-Lodo-ish Herb's Hideout
  5. Old-timey Canning Party. Get your late summer canned goods on! Hit up great produce deals of the week at organic produce suppliers like Sprouts, your local Farmer's Market, or a Pick Your Own farm. Then head to the friend's house with the biggest kitchen, crank up some music, and follow the easy instructions on your box of pectin. Need a preview of the process? Check out my solo Strawberry Freezer Jam endeavor. Next time, I'm adding company!
  6. Brunch. There's a reason that it's so common it's cliche - who doesn't love brunch?! Head to an eatery with bottomless mimosas, bellinis, or bloody marys to get the conversation flowing - Breakfast on BroadwayPanzano, or Maddie'sperhaps?
  7. 14-ers Club. Start with the easy ones, and work your way up. Make a goal of once a month and you'll have a reason to get together with friends for years! And your Facebook photos will improve dramatically.
  8. Matchmaker, matchmaker. Ever think that certain friends would hit it off, either romantically or as friendlies, if only they knew each other? What's holding you back? Select a few like-minded friends and meet up at the Museum of Contemporary Art, the Botanic Gardens, or Canvas and Cocktails. It will give you something to do, but still offer plenty of opportunities for finding out all that you have in common.
  9. Friends with Friends Lunch. Sometimes I am surprised by the "friends" that certain Facebook friends and I share. This is a great excuse for an intimate gathering with a few pals. Who knows what kind of fun things you'll learn about the people you thought you knew! Some easy and delicious lunch suggestions: Sushi SasaMarcos Coal-Fired Pizza, or Hi*Rise.   
  10. Six Degrees Get Together. This one has infinite possibilites! Using Facebook as a tool to make new friends in real life, start an event at an easy gathering place, like a picnic in Wash Park, and invite 6 friends...who then should invite six more friends...who each invite six more friends...and keep it going until you've reached six levels. Make sure there is plenty of food and booze to share, and try to find the common person that eventually links you to each new friend you meet! 
Who's with me? Or did you need to get back to FarmVille?

Tuesday, July 9, 2013

Privacy Lost

I miss my privacy. This may seem strange coming from a blogger (with tens and tens of readers!), but as a writer I choose what I share. Only the better recipes make the cut. The funniest stories, the cutest pictures of my kids. Even my foibles and heartaches are carefully selected - this isn't a trip to the therapist after all.

At my previous job, my boss often accused me of being afraid of the Internet. I think he based this on my resistance to embracing every new technology that was introduced. Little does he know, I also dislike the old technologies. I don't tweet, and unless you are a professional comedian or a food truck, I don't think you should either. Wanda Sykes has my favorite take on Twitter - "No one cares. Get a diary and lock that shit up!" I concur. And don't get me started on FourSquare. I think I can pass on being the virtual mayor of my local Starbucks, and the world at large doesn't care where I am having dinner. And quite frankly, I may not want them to know I'm there.

Facebook is the bane of my existence. We have a love hate relationship and I've almost called the whole thing off more than once. On one hand, it's a great way to get a snapshot of what old pals are doing with their lives - especially ones that live far away, or friends that used to trigger that "I wonder what they're up to now?" brand of nostalgia. But it's impossible to keep a tight lock on who sees what, and suddenly "friends" of "friends" (AKA dirty pedophile creepers) are commenting on pictures of my kids, and where we've decided to move, and I have to make triple sure I lock all the doors at night.

Youtube. That sweet sweet mecca of voyeurs and exhibitionists alike. Unless I am entertaining my kids with bootleg episodes of Ninja Turtles (thanks, cartoon nerds, I owe you) or learning how to sew a zipper, I avoid it at all costs. You will not find my family there. Why? Because the Internet never forgets, and the general population uploads their lives, and yours, without a second thought. It is weird, and wrong, that my boys will never have the experience of making a fool of themselves at a party and then 20 years later the only evidence being a friend's hazy memory and your word against theirs. I have a great video of Jude making up a funny little song about diarrhea (ah, boys) which could have been the next "Charlie bit my finger," but is it really fair if I open up his life to general consumption for a few moments of faux fame without his knowledge or permission? I say no. Parents of Youtube Sensation Kids make me a little ill.

Then we take these small annoyances, and add the greater infringements on privacy with Google Analytics (doesn't it ever bother you that after typing a mere "substi" the first search option provided is an eerily correct "substitute tomato paste for tomato sauce"?), Apple's ability to track your movements even when your phone isn't in use (not kidding - this is actually a default setting on Angry Birds - WTF?), and the NSA's interest in the phone conversations and grammatically challenged emails of the general public. Even our grocery store loyalty cards, while providing a cheap gas incentive, create profiles of our general likes and wellness based on buying habits. I despise this, and I want a way out. Or at least some form of protection.

So maybe you think I am being extreme, but for people who don't mind this infringement on their privacy, I would counter that you are being naive. Did you know that ad agencies utilize mapping software for their clients that will create a profile when you log onto the client's website that then tracks all of your keystrokes and mouse movements while on that site? From hospitals to online porn shops, they all know you were there and what you did. And what if you are one of the citizens whose phone is being tapped? Do you want someone else listening in on a fight with your spouse, or that embarrassing medical question you eventually had to call a nurse about, or your last two-hour marathon conversation with your best friend during which you finally told her the truth about that "blackout" night in college? These moments may not be incriminating, but they are intimate. You, as the owner of your life, should be the sole proprietor of your stories.

On a darker side, it does not take a great leap of the imagination to see the connection between a person Googling "herpes," to visiting a medical website, to that website selling your information to both the herpes pharmaceutical companies as well as the healthcare industry, resulting in a computer full of Valtrex ads and a higher medical premium. DuckDuckGo, a slightly inferior but far more private search engine, explains this really well on their site. Knowing that the things I do in the "privacy" of my home are stored by a corporation and are available to the government, or shifty employees, does give me pause before I delve into all that the web has to offer.

So what do we do? It is impossible to completely unplug without becoming a hermit, or a parent whose children will take advantage of their technological incompetence. I am constantly struggling with ways to take the best of what technology has to offer while trying to keep my privacy and my physical - and virtual - life intact. So yes, I use duckduckgo.com for all my herpes research and my husband has switched to an ad-free fastmail account in an attempt to start extricating the omnipresent Google from his life. We've locked down our picture websites so that only invitees can stalk our children. We've asked friends and family to be a little more cautious with their smart phones, Facebook, and Instagram accounts especially in reference to our kids.

And this is key I think.

When the same government that relies on NSA intel refuses to craft regulations that protect the average person from being spied on and recorded by the new Google Glass (yeah, go figure), we have to rely on each other at the very least. I can't keep the government out of my email, but with your help I can keep my kids off of Youtube. So here is my promise. I hope to have yours in return.

A pledge to my Family, my Friends...and my "Friends"
  • I promise to respect your personal boundaries with regards to social media and will not upload pictures of you, or information about you, without your permission. 
  • I promise to tell you of the permissions settings on my social media accounts so that you know if a picture is for my personal enjoyment or if it will be beamed out to friends of friends of friends across the world.
  • I promise not to take and share pictures of your children without getting your permission, and under no circumstances will I ever use your child's full name or tag our location. Ever.
  • I promise not to record and upload funny-to-me-embarrassing-to-you moments before you have a chance to process what happened in real life. But if it's really good, maybe you'll let me use it on my blog...
  • I promise not to share personal information about you in my status updates, or to refer to private matters on your Facebook wall. 
  • I promise not to judge the abundance of Valtrex ads on your laptop when you let me borrow it to check my email.
  • I promise to use common sense when deciding what information is worth sharing with the world at large, always keeping in mind that the Internet is never private and that it will not allow us to forget. 


Thursday, June 27, 2013

Blueberry Banana Bread

It's 90 degrees outside. I am tired of watching director's reels while simultaneously trying to find an "A-list photographer" who will work for high school intern wages. I have laundry to fold, chores to do, and fruit literally rotting on my counter in the kitchen. What's a girl to do? Why, fix a cocktail, crank up the air, and bake of course!

Drink pairing: San Pellegrino Aranciata Rossa with vodka over ice.

Music pairing: Nathaniel Rateliff. (You can watch a stellar Sideshow Alley rooftop performance here.)

Thermostat: 72 degrees...just until I don't want to melt, then it's back up to an eco-friendly 78.


Blueberry Banana Bread

Ingredients: 

2 cups flour
1 tsp baking soda
1/4 tsp salt
1/2 cup butter
3/4 cup light brown sugar
2 eggs, beaten
5 mashed bananas
1/2 cup blueberries

Preheat oven to 350 and lightly grease a loaf pan. I prefer Pyrex, as it never overcooks like the darker pans do.

Combine flour, baking soda, salt. Cream butter and brown sugar in a separate bowl. Stir in eggs and mashed banana until well blended. Fold in blueberries. Add to flour mixture until just mixed. Pour into loaf pan.

Bake 60-65 minutes. 
(For high altitude, I add 2 TB flax seed, turn the oven to 375, and bake for 60 minutes.)


Voila! A very banana-y banana bread with tart little blueberries to cut the sweetness. Okay, back to the grind...At least I'm buzzed and full!

Tuesday, June 18, 2013

Simple Strawberry Freezer Jam

I love jam. Real jam. Freezer jam like my Grandma used to make. So, I decided to ride out today's afternoon thunderstorm with some twangy tunes and canning.

If you'd like to join in, you'll need 4 pints of fresh strawberries (which are CHEAP right now - buy them up!), a lot o' sugar (come on folks, it's jam after all), and pectin. I need MCP brand pectin to make my Grandma's actual recipe and since I couldn't find that at the store, we'll be using two boxes of Sure-Jel pectin and following the recipe on the box. Beggars can't be choosers when ripe strawberries are on the line. They get moldy overnight.

I'll supply the tunes. Crank this up. I love me some Carolina Chocolate Drops.


Wash and cut up your strawberries, removing the stems and hull. This is a good time to run your canning jars through a quick cycle in the dishwasher to sterilize them if you haven't already. I bought these adorable half pint quilted glass freezer-safe jelly jars on sale at the grocery store. I always pick up a random box of canning jars whenever they go on sale...I have high hopes for putting them to good use!


(This music is fucking good, right?! The song at 4:40 is some booty-shaking, strawberry cutting, good time fun.)

Instead of hand mashing my berries in an old-timey fashion, I give them a few good pulses in the food processor. Old-timey people would approve. If I used a potato masher, I feel like they'd look at me, self-righteously working up a blog-worthy sweat, then glance at the shiny time-saving Cuisinart on the counter while clucking their tongues in disapproval and shaking their heads in a "people of the future are idiots!" kind of way.

Friendly advice:
Make sure that you don't accidentally puree the berries, as your jam will not set. And don't mess with the sugar ratio when we get there, as your jam will not set. And don't make more than a double batch or substitute one pectin for another. Why? Your jam won't set.

Q: What did my disposal have for dinner last night?
A: One huge batch of runny, pureed, low-sugar jam. Wa-wah.

Measure exactly 4 cups of pulpy strawberries. Pour into a large bowl and add 8 cups of sugar. Stir well and let sit for 30 minutes. Great time to go for a walk and get a leg up on these delicious calories!


Next bring 2 packets Sure-Jel and 1 1/2 cups of water to a boil. Boil for one minute stirring constantly. Add to your strawberries and stir continuously for 3 minutes or until all of the sugary grit is dissolved. Pour into your jam jars, leaving 1/2 inch of headspace to allow for expansion in the freezer.  Cover and let jam sit for 24 hours. Yield: roughly 10 cups of jam, and a few days of feeling pretty kick ass.


Tomorrow, put all but one jar in the freezer and they will keep for up to a year. Put the remaining jar in the fridge for immediate consumption. It will stay fresh for up to a month, but really, don't expect it to last that long. It's just that good.

Enjoy!


Thursday, June 13, 2013

$6 Pallet Compost Bin

I write a guest blog, Hey Neighbor, for Dwell Denver Real Estate once a month. This was June's post.

*****

Hey Neighbor,
What has two thumbs, 12 chickens, and more poop than she knows what to do with? This girl!

Urban farming has been an adenture so far. Harder than I anticipated when reading about it, but more gratifying than I could have imagined when I see our hand-raised chickens scratching for bugs, or the bees coming and going at the hives by the dozen. Lately we've turned our attention to waste, both the noun and the verb. 

The chickens are great garbage disposals and save a lot of food scraps from the trash. But once they process said scraps, there is a different kind of waste to deal with. Since I'd love to divorce myself from buying big box garden soil, a compost bin was the logical conclusion. And then I priced them. Yeah...After building a 200-square-foot chicken palace out of cedar, we were a little short on farm funds.

So, I hightailed it to my local feed store. I purchased used wooden pallets for $2 each. I saved myself $94 and saved the wood from the trash heap.


The fastest way to compost, besides having a huge pile of grossness rotting somewhere in the yard, is a three-sided bin with no top, no bottom, and plenty of air and moisture. Our perfect pallet composter was assempled and in use in under 10 minutes. 


Think you need 5 acres in the country to be able to compost? Think again. We are lucky and can hide the compost bin in the trees, but we've seen bins stashed at the side of the house, in a corner of the yard, hidden by bushes, painted to match the lawn furniture, and right smack next to the garden in all its rotten glory. 

Composting is easy, and virtually smell-free, if a few basic rules are followed:

1. Try to keep a 3:1 browns to greens ratio. 
  • Browns (carbon rich): dead leaves, small animal bedding, cardboard, newspaper, dead flowers and plants, sawdust, straw.
  • Greens (nitrogen rich): manure, grass clippings, fruits and vegetables, coffee grounds.
  • Do not compost meat, bones, cooked foods, cat litter - when in doubt use common sense. Or Google. 

2. Shred large materials for faster breakdown. For example, run the lawn mower over a pile of raked leaves before adding to the bin.

3. Add moisture. The best description I've heard is that the compost should be as saturated as a sponge that has been wrung out.

4. Turn compost weekly. 

5. When the compost is dark brown and smells like soil it's ready for the garden!


Good luck on this next project, neighbor! If I can do it, you can do it. Go forth and biodegrade! 

Wednesday, June 5, 2013

Grand Girls no more...

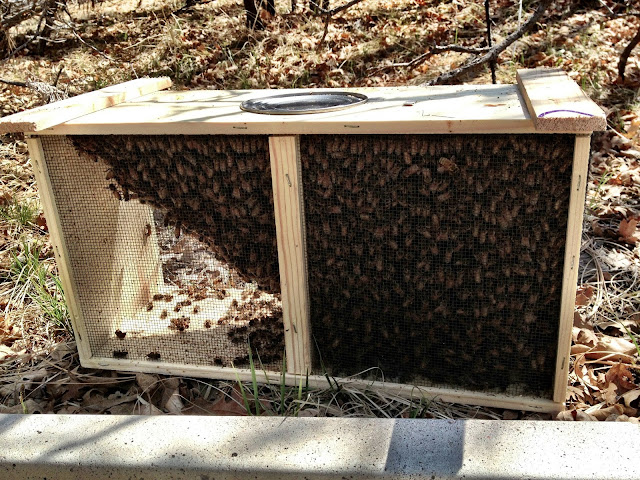
The Grand Girls are gone. No, my package colony did not up and die, but as Don the Bee Mentor has taught me, "A queen is a colony and a colony is a queen." Let me explain.

I picked up my package bees - the Grand Girls - from Apis Hive Co. at Denver Urban Homesteading at the beginning of May, and drove home with a buzzing backend and an anxious eye to potential car accidents. The bees of my imagination were suddenly oh so real.


Jude was fascinated and unafraid, which fueled my dreams of a future beekeeper in the making!


These original package bees had a marked queen who was easy to spot with her hot pink dot. When I installed the package I followed the instructions of Apis Hive Co. and removed the cork from the queen box and replaced it with a small marshmallow. The box was inserted into the hive, the bees were shaken over the top, and I utilized a baggie feeder of sugar syrup and an empty deep to ease their transition. Then I left the girls to their own devices for a week to allow the worker bees time to eat through the candy and free their newly accepted queen.


Upon first inspection a week later, there was comb being drawn and the queen was spotted, but the bees were too crowded to see what was happening within the comb itself.

And then came week 2, inspection #2...Bees, comb, pollen...no queen. No eggs. No baby bees. Me, freaking out that I somehow sentenced this colony to an early death with my inept beekeeping skills.

Enter Don the Bee Mentor!

Sidetrack: I must reiterate how wonderful it is to have a flesh and blood human being to turn to in times of bee crisis. And for a new beekeeper, these times are plentiful. I've read a hundred books, blogs and forums but nothing tops a teacher. For novice beekeepers lucky enough to live in the Denver area, Don offers a yearlong mentoring program that will teach everything from routine inspection, to splitting your hives (I can personally attest to the magic and relevance of this particular skill set), to managing varroa mites without pesticides, to harvesting that pot of gold at the end of the rainbow, HONEY. For beekeepers outside my area, I urge you to contact your local bee clubs and find a skilled mentor to apprentice yourself to. Bees may not require large amounts of your time, but they require finesse and a vast base knowledge that benefits from hands-on instruction. Back to the original story...

Don talked me off my crazy tangent and let me know that there were a few possible reasons for the loss of the queen and they weren't, as in the case of our poor chicks, a result of me. First, she may not have been mated properly. She may have been released too quickly and killed by the colony. She may have flown off. And finally, she's a bug - maybe she just died.

I had about a week, since the bees had been without a queen for at least 5 days, to get a new queen before a worker started laying drones (bad news) and/or the current colony started dying of old age. This is when Don sent me to Tim Brod of Highland Honey Bees.

Tim, of the "stung on the eyelid" posting of yore, happened to be boxing queens within the next two days. Lucky me! I drove to Boulder on a random afternoon, purchased a queen and received her majesty and a few attendants in a disposable coffee cup, and drove home. Fun drive.


Don and Tim both instructed me on a different, and (spoiler alert!) more successful, way to hive a queen. Keeping the cork intact, I sandwiched the queen box between 2 frames in the hive and left her for 3 days. I checked back in and noticed that the bees were not being particularly gentle with the queen box - attempting to sting it and buzzing at an uncomfortable level while I was inspecting the hive. Playing it safe, I left the queen in the box for another day and then revisited the hive on her 4th morning in residence. What a change! The bees were calm and though they were drawn to the box they were not trying to hurt her. I carefully shook the queen to the bottom of the box, pushed in the cork with a nail, and placed her on top of the frames. She exited immediately and disappeared into the hive.

And now? Well, the Carniolan Grand Girls will help attend to a new line of Carniolan/Italian hybrids that will replace them when they are gone. I inspected the hive yesterday (no pics - I was racing an afternoon thunderstorm) and while I did not see the queen...I did see bee larvae! For the first time, this colony of bees is on its way to being a successful superorganism. Though they are off to a late start, and I don't expect any surplus honey from the ladies this season, I have great expectations of being able to shepherd the bees into a successful survival of winter.

Now, all that is left is the naming of the new colony. Any suggestions?